The Importance of Surface Roughness in Manufacturing
The quality of finished parts is paramount in manufacturing applications, as it directly influences the performance and reliability of the final product. A critical aspect of this quality is the surface finish, which measures the texture of a surface resulting from manufacturing processes. Among the factors that define surface finish, surface roughness stands out as a crucial component, profoundly affecting the functionality and lifespan of manufactured items.
Impact of Surface Finish
Understanding the importance of surface finish is essential for professionals involved in aluminium die casting, plastic moulding, CNC machining, precision stamping services, and sheet metal fabrication.
Surface finish impacts several critical aspects of a component’s performance:
- Mechanical Performance: Surface finish affects the component’s ability to withstand stress and strain.
- Longevity: A smoother surface finish can reduce wear and tear, extending the component’s lifespan.
- Friction and Wear Rate: Proper surface finish minimizes friction and wear, enhancing the efficiency and durability of moving parts.
- Noise Generation: Surface finish influences the noise produced by interacting parts.
- Lubricant Retention: The ability to hold lubricant is critical for the smooth operation of many mechanical systems.
Aesthetic Appeal
In consumer-facing industries, a product’s aesthetic appeal is increasingly essential. While a component may meet all functional requirements, its appearance can impact customer satisfaction and acceptance. A high-quality surface finish enhances the visual appeal, ensuring that products perform well and look good.
Why Surface Finish Matters
Rough surfaces tend to wear out faster. Higher friction levels on these surfaces lead to breaks and corrosion at irregularities, causing materials to wear down more quickly. However, a certain degree of roughness can enhance adhesion. Therefore, specifying the surface finish is vital—it’s not something you should leave up to interpretation. If surface finish is essential for your product, this guide is for you.
What is Surface Finish?
Before diving into the surface finish chart, let’s define what surface finish entails. Surface finish alters a metal’s surface by removing, adding, or reshaping material. It measures a product’s surface texture, defined by surface roughness, waviness, and lay.
Critical Components of Surface Finish
- Surface Roughness: This measures the total spaced irregularities on a surface. When machinists talk about “surface finish,” they usually mean surface roughness.
- Waviness: This describes a warped surface where the spacing is greater than that of surface roughness.
- Lay: refers to the direction of the predominant surface pattern, determined by the methods used to create the surface.
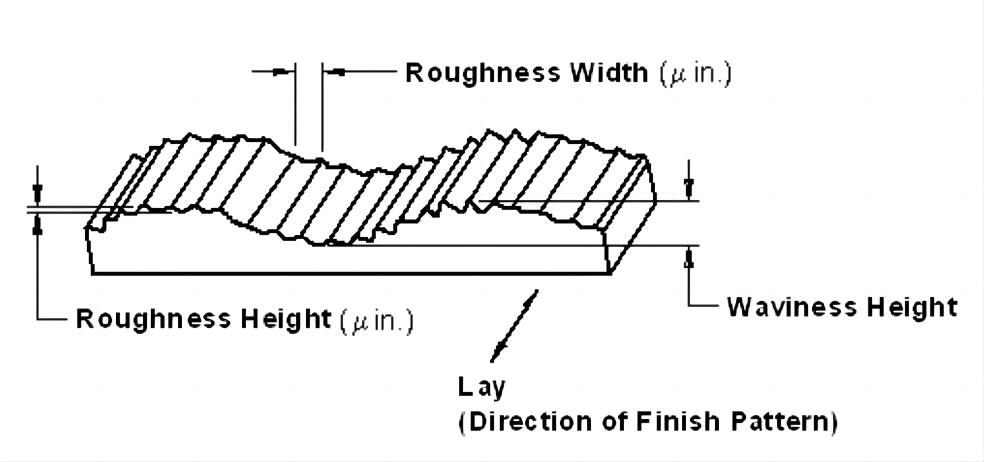
Understanding these components helps achieve the desired surface finish, ensuring product performance and longevity. Manufacturers can produce reliable and high-quality products by maintaining optimal surface finish standards.
Measuring Surface Finish
Surface finish is measured using various methods, which can be categorized into three main techniques:
- Profiling Techniques involve using a high-resolution probe to measure the surface profile, similar to a phonograph needle.
- Area Techniques: These measure a finite surface area and provide a statistical average of peaks and troughs. Examples include optical scattering and capacitance probes.
- Microscopy Techniques: These qualitative methods measure contrasts and provide detailed information about surface peaks and valleys.
Surface Roughness Chart
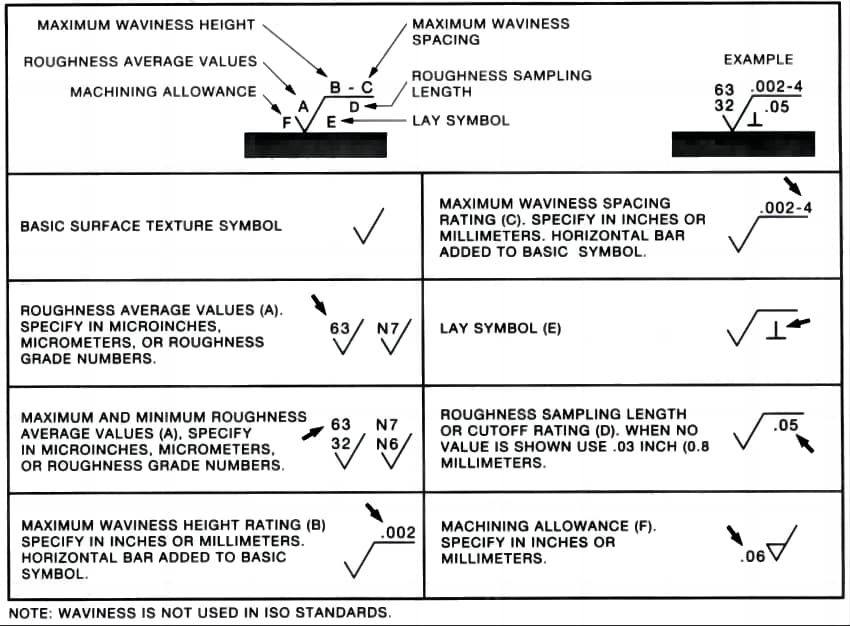
A surface roughness chart is an essential tool for engineers and manufacturers. It provides standardized values and notations for different surface finishes, enabling professionals to ensure their products meet the desired quality and performance standards. Typical parameters in surface roughness measurements include:
- Ra (Average Roughness): The arithmetic average of surface heights measured across a surface.
- Rz (Average Maximum Height): Measures the average of a surface profile’s most significant peak-to-valley differences.
- Rmax (Maximum Roughness Depth): Indicates the vertical distance between the highest peak and the deepest valley.
Demystifying the Surface Roughness Guide
Grasping the intricacies of surface roughness is fundamental for enhancing manufacturing processes. A Surface Roughness Guide, typically presented as a chart, aids manufacturers in understanding and managing the texture of their machined parts.
The Importance of the Machining Surface Finish Chart in Manufacturing
The Machining Surface Finish Chart is an indispensable tool for manufacturing engineers. It provides an organised visual guide for assessing and controlling the surface texture of machined parts. Manufacturers can use this chart to ensure their components meet precise design specifications and performance requirements.
Utilising this chart enhances product consistency and reliability. It also boosts efficiency by reducing unnecessary reworks and waste. Additionally, it facilitates better communication between designers, manufacturers, and quality control, thereby minimising errors due to misinterpretation.
Surface Texture Conversion Chart with Different Roughness Scales
The Surface Texture Conversion Chart is another vital tool for managing surface finish. It displays the equivalent values of various surface roughness parameters in different units, such as microinches (µin), micrometres (µm), and nanometres (nm).
These charts are handy when dealing with international standards or specifications that use different units of measurement. They also help in understanding the correlation between different roughness parameters.
Comparing Ra, RMS, CLA, Rt, N, and Cut-Off Length
Comprehending different surface roughness parameters is essential for precision manufacturing. Here are some key parameters:
- Ra (Average Surface Roughness): This represents the average deviation of the surface profile from the mean line over a specified length.
- RMS (Root Mean Square): Similar to Ra but focuses more on peak values, often resulting in slightly higher values.
- CLA (Centre Line Average): Equivalent to Ra but less commonly used.
- Rt (Total Height of the Roughness Profile): Measures the height from the highest peak to the lowest valley within the evaluation length.
- N (Sampling Length Count): Denotes the number of sampling lengths on the surface.
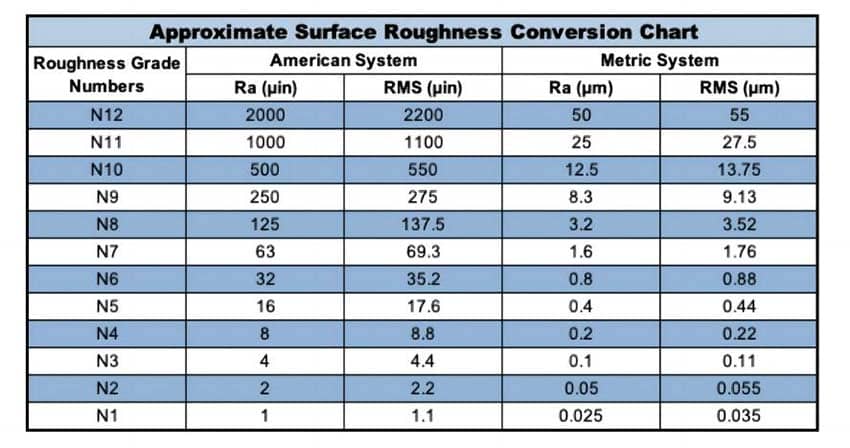
Another critical parameter is the cut-off length or Sampling Length. It’s the reference length over which the surface parameters are evaluated, and it needs to be substantial enough to capture the surface’s representative features.
A comprehensive understanding of surface roughness and using tools such as the Machining Surface Finish Chart and Surface Texture Conversion Chart is essential for precision manufacturing. These tools help ensure components meet design and performance standards, improve product consistency, and enhance stakeholder communication. Mastering these concepts enables manufacturers to improve their processes and products significantly.









No comment